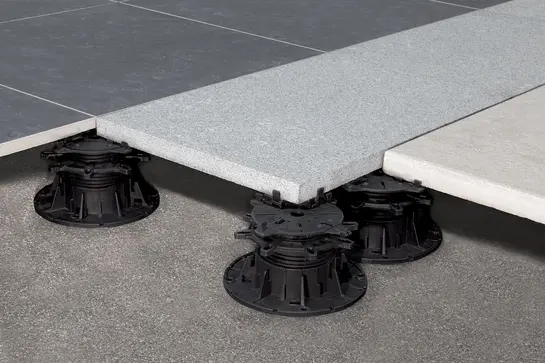
The installation instructions of paver manufacturers and national standards applicable in individual countries (DIN standards, technical bulletins etc.) must be followed for installation!
The design requirements with regard to the slope situation, compression strength of the installed insulation materials, and waterproofing substances (film compatibility) must be verified.
Pavers can be installed in any assembly type (manufacturer specifications may need to be met).
Notes:
According to the applicable regulations, pavers may be installed without a surface slope. Please note that shifts may occur in loosely installed paver coverings due to one-sided or corner loads.
Recommendation: To guarantee sufficient construction space, we recommend starting with a tile and paver support height of at least 10 mm.
As a full-area waterproofing protection, we recommend the use of the drainage mats Schlüter-TROBA-PLUS or Schlüter-DITRA-DRAIN.
It is best to create an installation diagram for neat joint appearance.
Please refer to the product data sheet under Downloads for drawings that illustrate the below steps.
- The substrate must be load-bearing, with a recommended minimum slope of 1.5 - 2.0%.
Manufacturer specifications regarding the load-bearing capacity of tiles and pavers must be observed. The installation of additional paver supports may be necessary. - TROBA-LEVEL-PL 10 tile and paver supports (10 mm) can be stacked with a 90° offset.
- From an assembly height of 50 mm, TROBA-LEVEL-PLA 30 blocks (30 mm each) can be inserted between two TROBA-LEVEL-PL 10 tile and paver supports.
- Levelling the slope: Use a spirit level to check how many TROBA-LEVEL-AP 1 levelling shims (1 mm each) have to be stacked. If more than nine TROBA-LEVEL-AP 1 levelling shims are needed, an additional TROBA-LEVEL-PL 10 paver support (10 mm) should be stacked instead. TROBA-LEVEL-AP 1 levelling shims (1 mm) are snapped in laterally – make sure they are fully attached.
- Keep the installation direction in mind.
- Only stack as many TROBA-LEVEL-AP 1 levelling shims as required to reach the level of the adjacent paver.
- Tile and paver supports at the edge can be stacked with a 90° offset to reach the necessary assembly height. TROBA-LEVEL-PL 10 supports (10 mm) can be cut into halves or quarters for use at edges or in corners (min. tile or paver width 60 mm). To this end, score the support with a cutter knife, break it off, and then trim off any unneeded connectors. Determine prior to cutting which halves fit together.
- Edge solution from 50 mm assembly height (including with cove shaped edge formations): Protruding connectors must be trimmed from an assembly height of 60 mm.
- Corner solution from 50 mm assembly height (including with cove shaped edge formations): Protruding connectors must be trimmed from an assembly height of 60 mm.
- From an assembly height of 60 mm, you can also install rotatable TROBA-LEVEL-PLV 60 paver supports. The individual supports can be variably set up to a height of 130 mm by turning the setting wheel. For heavy use areas, additional mechanical fixings may need to be used to aid the locking mechanism.
- If necessary, the final levelling and slope adjustment can be carried out with TROBA-LEVEL-AP 1 levelling shims (see Item 6).
- If the required assembly height exceeds 130 mm, the TROBA-LEVEL-PLV 60 paver support can be combined with TROBA-LEVEL-PLA 30 as well as TROBA-LEVEL-PL 10 paver supports.
- All assembly heights from 60 to 520 mm can be achieved by stacking up to four TROBA-LEVEL-PLV 60 paver supports on top of one another. The paver supports must be snapped together.
- Edge/corner solution: Saw off the bottom plate in accordance with the underside cutting mark and fold the wall spacer up (see marking in Figure 14 of product data sheet). Any unnecessary connectors can be removed. The minimum paver width is 85 mm.
- Extension: TROBA-LEVEL-PLA 70 (H = 70 mm) enable the quick installation of larger heights. These adapters must be fully screwed into the bottom plate of TROBA-LEVEL-PLV 60. TROBA-LEVEL-PLA 70 is not designed for levelling. Make sure not to obstruct any existing drainage openings in the support profile when inserting Schlüter-BARA-RHA.
- You can optionally use the tile and paver supports TROBA-LEVEL-LV 3 (diameter 200 mm, height 3 mm) for load distribution, which can be combined with TROBA-LEVEL-PL 10 and TROBA-LEVEL-PLA 30 supports. The tile and paver support TROBA-LEVEL-LV 3 is also suitable for creating low-height assemblies – final levelling is done with the levelling shims TROBA-LEVEL-AP 1. TROBA-LEVEL-LV 3 can be cut to size and features 3 mm connectors that guarantee an evenly spaced joint formation.
- Protection of waterproofing assembly: For protective requirements, attach the bottom plates of TROBA-LEVEL-PLV 60 or TROBA-LEVEL-LV 3 in the slitted cuts of the protective support pads TROBA-LEVEL-PLS 6 (height = 6 mm). In the case of PVC waterproofing assemblies, the aluminium separating layer of the protective support pads must be installed face down. If using TROBA-LEVEL-PL 10 tile and paver supports, these must be placed in the centre of the pads.
Estimated quantity calculation of paver supports
- 60 x 60 cm ~ 3.4 supports/m²
- 75 x 75 cm ~ 4.0 supports/m²
- 30 x 120 cm ~ 7.0 supports/m²
- 40 x 120 cm ~ 5.4 supports/m²


